How to create a new ansible role

I’ve recently started playing with ansible so I’ve just barely got the basics of this automation technology. I’ve previously used Chef or Saltstack but, this is something new for me. In today’s article I’ll show you how to create a new ansible role. Roles are somehow like Chef cookbooks because they provide all the needed information such as attributes, handles, tasks, etc. to install and configure a particular application.

To create a new role with ansible simply use the ansible-galaxy init role_name command. Note that if you are behind a firewall and cannot access the ansible api server from within your network, you can use the –offline option to create the role locally:

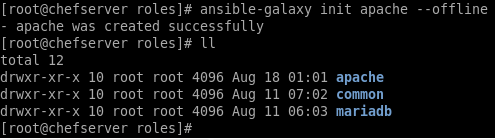
ansible-galaxy init apache –offline

ansible-galaxy command

ansible-galaxy command

Note that right now a directory tree has been created in the specified role. I’ve used  the find command to list all dirs:

[root@chefserver apache]# find -type d -exec ls -d1 {} \;
.
./templates
./vars
./tasks
./defaults
./files
./meta
./handlers
./tests

You can also use the tree command which must be installed if you are using the CentOS minimal image:

[root@chefserver roles]# tree apache/
apache/
├── defaults
│   └── main.yml
├── files
├── handlers
│   └── main.yml
├── meta
│   └── main.yml
├── README.md
├── tasks
│   └── main.yml
├── templates
├── tests
│   ├── inventory
│   └── test.yml
└── vars
└── main.yml

8 directories, 8 files

Each directory has a specific functionality within the role as follows:

defaults – location for the default variable for your role. I’m still new with ansible variable precedence but, I’ve learned so far that variable defined in the defaults directory of a role can be easily overwritten because they have the lowest priority. This is where you define a variable value just in case there is none defined when the role is called.
files – this is where you store any file that must be copied on the destination machine. Within this directory you can store any files such as configuration files, rpm packages. Note that files stored within this directory cannot be modified as templates so usually they are just copied to the destination machines.
handlers – notify directives within ansible tasks usually interact with system services. Within the handlers directory you store any definition for System services.
meta – role dependencies are stored within the meta directory. It also hosts other information for a specific role such as the author of the role, the description, company name, license, minimum ansible version, supported platforms, categories.
tasks – installation and configuration actions for that specific role
templates – location for ansible templates. These are files that are written in Jinja2 templating language and can be modified as the machine is provisioned. Note that you can customize a template for any structure or configuration needed.
teststhis is where you would place any verification mechanism for the results of your role
vars – directory used to store variables for the role. Variable stored here have higher priority than those stored on the defaults directory.

Creating an encrypted data bag in Chef 12

In this article we’ll proceed further in our Chef12 discovery and we’ll discuss a bit about encrypted data bags. Data bags are used to store sensitive information that must not be accessed by unauthorized users such as passwords or certificates. Whatever secret information you want to use in your Chef cookbooks, it’s best that you stored them safely encrypted in a data bag. For this demonstration we’ll create a data bag in which we’ll store the credentials of our Zabbix server.

Before we create the data bag we need to generate the secret file that will be used to encrypt the data bag by using the following command:

openssl rand -base64 512 | tr -d ‘\r\n’ > encrypted_databag_secret

This command will create a new file in the current location and it’s recommended that you set the 400 (owner read only) permissions on it:

chmod 400 encrypted_databag_secret

Now it’s time to create the data bag by using the following command:

[root@Centos06-1 passwords]# knife data bag create passwords
Created data_bag[passwords]


In our data bag we’ll store the credentials for our Zabbix server so we need to proceed with the following:

  • Generate a strong password using the following command:

[root@Centos06-1 passwords]# openssl rand -base64 32
fxEk31+tfD0PNZI/u/k5SaXlsO47H90BZw2qSo7pl3Q=

  • Create a new json file named zabbix.json and add the following lines:

{
“id”: “zabbix”,
“username”: “zabbix”,
“password”: “lCb+Y84iOzv1SWJpSkTYDG7naSzKCqihFTJGqkjDyXE=”
}

the “id” is a mandatory field which represents the data bag name

  • Once the data bag file is created we need to encrypt and upload it on the Chef 12 server. To achieve this result use the knife data bag from file command:

[root@Centos06-1 passwords]# knife data bag from file passwords zabbix.json –secret-file /etc/chef/encrypted_databag_secret
Updated data_bag_item[passwords::zabbix]

Note that we’ve used the previously created secret file to encrypt the data bag (using the –secret-file parameter).


Now that the encrypted data bag has been created, we can use the following command to verify the configuration:

knife data bag show passwords zabbix

Chef encrypted data bag

Chef encrypted data bag

Note that the data bag is encrypted, to visualize the clear text content of the data bag execute the following command:

knife data bag show passwords zabbix –secret-file /etc/chef/encrypted_databag_secret

Display encrypted data bag content

Display encrypted data bag content

The encrypted data bag was created on the server but, on your local repository it’s still stored in clear text. To encrypt the local data bag as well use the same command used previously and add the -z parameter, as follows:

[root@Centos06-1 passwords]# knife data bag from file passwords zabbix.json –secret-file /etc/chef/encrypted_databag_secret -z
Updated data_bag_item[passwords::zabbix]

That’s about it for this article folks, we’ve created an encrypted data bag in our Chef 12 with the credentials of our Zabbix Server. If you have any questions on this topic don’t hesitate to post a comment in my dedicated section and I’ll respond asap. Wish you all the best and stay tuned for the following articles from IT training day.

How to install and configure knife

In this article I will show you how to install and configure the knife application that is used to interact with the chef 12 server that we’ve created in a past article.

The first thing you’ll have to do is install the chef package by running the following command:

yum install -y chef

Wait for the installation to finish before proceeding further. Note that I’ve created my own yum repository in which I’ve saved the necessary package. If you don’t have a yum repository you can download the package locally and use the following command to install it:

rpm -Uvh chef-12.10.24-1.el6.x86_64.rpm

Once the package has been successfully installed, navigate to your user’s home directory. Note that you have to create the user account on the chef server. Please check out the last chef article before proceeding further if you don’t already have the user account and the organization created in the chef server.

Now create a directory .chef by using the mkdir .chef command.

Copy the validation file of the chef organization and the user account .pem file in this location. Create a file named knife.rb and add the following lines within it:

[root@Centos06-1 .chef]# cat knife.rb
current_dir = File.dirname(__FILE__)
log_level :info
log_location STDOUT
node_name “root”
client_key “/root/.chef/root.pem”
validation_key “/root/.chef/ppscu-validator.pem”
chef_server_url “https://ChefserverURL/organizations/ppscu”
cookbook_path [“/opt/chef-repo/cookbooks”]
ssl_verify_mode [:verify_none]
verify_api_cert “false”

The important lines that must be edited are: node_name, client_key, validation_key, chef_server_url and cookbook_path. Save the file and exit the text editor.

Note that if the chef_server_url has been configured correctly you should now be able to interact with the chef server.

Use the knife node list or knife environment list to verify that you can interact with the server. Note that if you receive any ssl errors, use the knife ssl fetch and knife ssl check commands to fix the issue.

You should now have knife application installed and configured and you should also be able to interact with the chef server

How to install and configure Chef 12

In this article I will show you how to install and configure a Chef 12 server that is used within your enterprise for IT automation.

The first thing we have to do is to install the chef server package and all its dependencies. I’ve created my own chef repository to store all packages that are needed for the server:

[root@Centos06-1 packages]# cd Chef/
[root@Centos06-1 Chef]# ll
total 656944
-rw-r–r– 1 root root 52338858 Jun 4 10:03 chef-12.10.24-1.el6.x86_64.rpm
-rw-r–r– 1 root root 142488123 May 16 19:53 chefdk-0.14.25-1.el6.x86_64.rpm
-rwxr-xr-x. 1 apache apache 477870942 May 7 11:02 chef-server-core-12.6.0-1.el6.x86_64.rpm
drwxr-xr-x 2 root root 4096 Jun 4 10:04 repodata
[root@Centos06-1 Chef]#

Once I’ve placed all the rpm files there, I’ve created a new yum repository and now I can simply install the server by using the following command:

yum install -y chef-server-core

If you don’t have a local yum repository with the necessary chef package, you can download the package manually and use the rpm -Uvh chef-12.10.24-1.el6.x86_64.rpm command and wait for the installation to finish.

Now execute chef-server-ctl reconfigure to allow the server to configure and start all its services. Note that this part may take a long period of time until all the services are up and running.

Once the configuration is completed, it’s time to create our first admin account by using the following command:

chef-server-ctl user-create root root root root@ppscu.com ‘Password’ –filename ~/.chef/root.pem

where the first root stands for username, the second one for first name, then the last name and the email. You’ll also have to add the password and the –filename parameter to save the user’s private key locally. This file is used later to interact with the chef server by using the cli.

To ensure that your username was created, run the chef-server-ctl user-list command:

[root@Centos06-1 chef]# chef-server-ctl user-list
pivotal
root
[root@Centos06-1 chef]#

You can delete a user with the following command: chef-server-ctl user-delete root

Now that we’ve created the admin user account, it’s time to create a new chef organization and associate this user account to it:

chef-server-ctl org-create ppscu ‘ppscu.com’ –association_user root –filename /etc/chef/ppscu-validator.pem

The validator file is used when you need to interact with the newly created organization

Once the organization has been created, run the following command to verify its config:

[root@Centos06-1 chef]# chef-server-ctl org-list
ppscu

You can also install the chef-manage packet which adds the web interface that can be used to interact with the chef server. Run the following commands in order to configure chef-manage:

chef-server-ctl install chef-manage

chef-server-ctl reconfigure

chef-manage-ctl reconfigure

Now you should have your chef server up and running with all the necessary services configured and the admin account assigned to a new organization.